The Complete Toolkit You’ll Need (Affiliate Links Included)
Before you start learning how to deep clean kitchen step by step, gather these supplies. I’ve personally tested every product type below. Click the links to grab them on Amazon—they’ll save you hours.
Essential Cleaning Agents
-
Degreaser – For walls, range hoods, and greasy stovetops. [Buy: Krud Kutter Original Concentrated Degreaser] – This stuff melts through caked-on oil like magic.
-
Baking soda & White vinegar – Natural powerhouse for drains and ovens.
-
Bleach spray – For disinfecting sinks and cutting boards.
-
Glass cleaner – Streak-free for windows and stainless steel.
-
Heavy-duty oven cleaner – [Buy: Easy-Off Professional Fume Free Oven Cleaner] – No harsh fumes, works in 20 minutes.
Tools & Accessories
-
Microfiber cloths (12-pack) – [Buy: Amazon Basics Microfiber Cloths] – Use color-coded ones (blue for glass, yellow for counters).
-
Scrub brushes – [Buy: OXO Good Grips Deep Clean Brush Set] – Includes a large brush for floors and a small one for grout.
-
Toothbrush (old or new) – For corners and crevices.
-
Squeegee – For wiping down backsplashes and windows.
-
Steamer – [Buy: Dupray Neat Steam Cleaner] – This is my secret weapon for sanitizing without chemicals. Worth every penny.
-
Rubber gloves – Protect your hands from harsh chemicals.
-
Bucket – For mixing solutions.
Specialty Items
Pro tip: Bookmark these links. You’ll thank me when your oven looks new again.
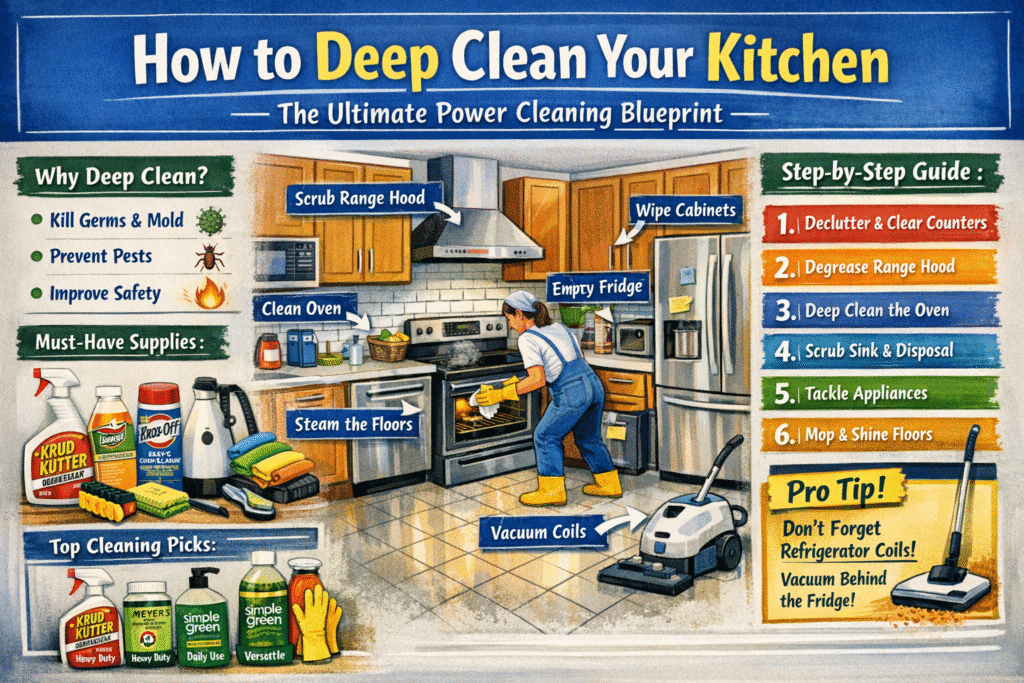
Step-by-Step: How to Deep Clean Kitchen Like a Pro
Now for the main event. Follow this order exactly. Don’t jump around—you’ll just spread dirt from one area to another. Learning how to deep clean kitchen efficiently means working top to bottom, dry to wet.
Step 1: Clear and Declutter
Empty your countertops completely. Put everything on your dining table or in a box. Take out all small appliances (toaster, coffee maker, air fryer). Remove spice racks, utensil holders, fruit bowls—everything. You can’t properly learn how to deep clean kitchen surfaces if they’re covered in clutter.
Step 2: Attack the Upper Cabinets and Walls
Dust and grease float upward. Start by wiping down the top of your cabinets (even if you can’t see it, there’s a thick layer of greasy dust up there). Use a microfiber cloth with warm water and a drop of dish soap. Then wipe down all cabinet fronts. For wood cabinets, use a wood-safe cleaner. For painted or laminate, use degreaser.
Step 3: Deep Clean the Range Hood and Stovetop
This is where most people mess up how to deep clean kitchen areas. Remove the range hood filters. Soak them in hot, soapy water or a degreaser solution for 30 minutes. Meanwhile, scrub the hood’s exterior and the stovetop. If you have a gas stove, remove the grates and burner caps. Soak them too. Use a toothbrush to clean around each gas nozzle.
Affiliate recommendation: [Buy: Weiman Gas Range Cleaner Kit] – Includes a scraper and special formula for burnt-on messes.
Step 4: The Oven (Don’t Skip It)
If your oven has a self-cleaning mode, run it now (but open windows—the smell is intense). If not, spray oven cleaner inside, wait the recommended time, then wipe. For stubborn spots, make a paste of baking soda and water, spread it on, let it sit overnight, then wipe clean.
Affiliate recommendation: [Buy: Scrub Daddy Damp Duster] – This thing gets into oven corners without scratching.
Step 5: Countertops and Backsplash
Now that everything above is clean, wipe down your counters. Use a different cloth for each material: granite needs a pH-neutral cleaner, quartz needs mild soap, and butcher block needs an oil treatment. For tile backsplash, use a grout brush and a bleach solution (1:10 bleach to water) to kill mold.
Step 6: The Sink and Disposal
Your sink is dirtier than your toilet. I’m serious. To properly execute how to deep clean kitchen sinks, start by sprinkling baking soda all over the wet sink. Scrub with a brush. Then pour white vinegar down the drain—it will fizz. Let it sit for 10 minutes. Rinse with boiling water. For stainless steel sinks, polish with a drop of mineral oil to prevent water spots.
Pro move: Throw a few ice cubes and a sliced lemon into the garbage disposal. Run it with cold water. This sharpens the blades and freshens the smell.
Step 7: Appliances (Fridge, Microwave, Dishwasher)
-
Microwave: Heat a bowl of water with lemon slices for 3 minutes. The steam loosens gunk. Wipe easily.
-
Refrigerator: Empty everything. Remove shelves and drawers. Wash them in the sink with soapy water. Vacuum the condenser coils in the back or underneath (use that coil brush I linked earlier). This alone can cut your electric bill by 15%.
-
Dishwasher: Place a cup of white vinegar on the top rack. Run a hot cycle. Then sprinkle baking soda on the bottom and run a short cycle. Wipe the door gasket with a bleach solution.
Affiliate recommendation: [Buy: Affresh Dishwasher Cleaner Tablets] – These are foolproof for monthly maintenance.
Step 8: Floors and Baseboards
Sweep first, then mop. But here’s the secret to how to deep clean kitchen floors: use a steam mop if you have tile or sealed hardwood. For grout lines, use a grout brush with a baking soda paste. Don’t forget the baseboards—they collect a shocking amount of grease and dust. Wipe them with a damp microfiber cloth.
Step 9: The Final Touches
Replace your cabinet liners if they look gross. Wipe down light switches, outlet covers, and cabinet handles (these are bacteria hotspots). Take out all trash and recycling. Finally, put everything back on your counters—but only after you’ve cleaned each small appliance individually.
Comparison Table: Top 3 All-Purpose Cleaners for Deep Cleaning Your Kitchen
Not all cleaners are created equal. When you’re serious about how to deep clean kitchen surfaces, you need the right chemistry. Here’s how my top three favorites stack up.
My verdict: If you only buy one, get Krud Kutter for deep cleaning days. It’s the only thing that removes year-old grease from my range hood without endless scrubbing. For everyday upkeep, Mrs. Meyer’s is safer for granite and quartz.
Pros and Cons of Deep Cleaning Your Kitchen (The Honest Truth)
Let’s be real. Learning how to deep clean kitchen thoroughly has upsides and downsides. Here’s my unfiltered list.
Pros
-
Healthier home: Kills mold, bacteria, and allergens hiding in grout, fridge seals, and drains.
-
Pest prevention: Removes crumbs and grease that attract ants, roaches, and mice.
-
Longer appliance life: Clean coils and filters mean your fridge and oven last years longer.
-
Better cooking experience: A clean kitchen actually makes you want to cook healthy meals.
-
Pride of ownership: You’ll feel amazing every time you walk into your kitchen.
-
Higher resale value: Spotless kitchens sell homes faster.
Cons
-
Time-consuming: A full deep clean takes 4–8 hours depending on kitchen size.
-
Physically demanding: Scrubbing, bending, and lifting heavy appliances can hurt your back.
-
Cost of supplies: Good cleaners, brushes, and steamers add up (though they last for years).
-
Chemical exposure: Harsh degreasers and oven cleaners require gloves and ventilation.
-
Overwhelming for beginners: Without a system like the one above, it’s easy to get lost and quit halfway.
Bottom line: The pros massively outweigh the cons if you do it right. And once you’ve done a full how to deep clean kitchen routine, maintaining it takes just 10 minutes a day.
Read More :- Designer Approved: 15 Smart Kitchen Organization Ideas for Small Spaces for Your Apartment
FAQ: Your Most Common Deep Cleaning Questions Answered
1. How often should I deep clean my kitchen?
A: Ideally, every 3–6 months. If you cook greasy food daily (like frying or roasting), lean toward every 3 months. For light cooking, twice a year is fine. But learn how to deep clean kitchen properly once, and spot-cleaning in between becomes effortless.
2. Can I use bleach on all surfaces?
A: No. Never use bleach on stainless steel, granite, marble, or unsealed wood. It causes pitting and discoloration. Stick to bleach only for white tile grout, plastic cutting boards, and inside your sink. For everything else, use hydrogen peroxide or a dedicated disinfectant.
3. What’s the fastest way to degrease my range hood?
A: Remove the filters and soak them in a sink full of hot water and Krud Kutter (linked above) for 30 minutes. Then scrub with a brush. For the exterior, spray degreaser and let it sit for 5 minutes before wiping. This is the single biggest timesaver I’ve found in how to deep clean kitchen greasy zones.
4. Do I really need a steam cleaner?
A: You don’t need one, but after using the [Dupray Neat Steam Cleaner](affiliate link), I’ll never go back. It sanitizes floors, ovens, and microwave interiors without any chemicals. Plus it blasts off stuck-on food from stove grates in seconds. It’s a $150 investment that pays for itself in saved elbow grease.
5. How do I deep clean kitchen cabinets without ruining the finish?
A: First, identify the material. Painted cabinets: use mild dish soap and water only. Wood cabinets: use a wood-specific cleaner (like Murphy’s Oil Soap). Laminate: use a degreaser but rinse immediately. Never soak or scrub with abrasive pads. Dry with a microfiber cloth to prevent water rings.
6. What’s the one area most people forget when deep cleaning?
A: Without a doubt, the refrigerator coils. Most people don’t even know they exist. But dusty coils make your fridge work harder, use more electricity, and die sooner. Use a [coil brush](affiliate link) every 6 months. Your wallet will thank you.
7. Can I deep clean my kitchen naturally without harsh chemicals?
A: Yes, but it takes more scrubbing. Use baking soda for abrasion, white vinegar for grease (mix 50/50 with water), and lemon juice for shine. For disinfecting, use 70% isopropyl alcohol or hydrogen peroxide. However, for baked-on oven grease or moldy grout, you’ll eventually need a commercial product. My approach: use natural for daily cleaning, and harsh chemicals only for quarterly deep cleans.
8. How do I make my stainless steel appliances streak-free?
A: Wipe with the grain (direction of the brushed metal) using a microfiber cloth and a drop of mineral oil or a dedicated stainless steel cleaner. Never use paper towels—they leave lint and micro-scratches. [Buy: Weiman Stainless Steel Wipes](affiliate link) are idiot-proof.
9. Should I hire a professional instead of doing it myself?
A: Professional deep cleaning costs $200–$500 per visit. If you have mobility issues, a huge kitchen, or zero free time, it’s worth it. But if you follow my guide on how to deep clean kitchen yourself, you’ll save that money and know exactly what products touch your surfaces. I recommend doing it yourself at least once so you understand your kitchen’s problem areas.
10. What’s the biggest mistake people make when deep cleaning?
A: Going top-to-bottom is wrong. Wait—no, I said earlier to go top-to-bottom. Let me clarify: You go dry to wet and top to bottom only after you’ve pre-cleaned loose debris. The biggest mistake is spraying wet cleaner on a dusty surface—you just make mud. Always dry-dust cabinets, walls, and floors before applying any liquid. That’s the pro secret to how to deep clean kitchen without spreading filth everywhere.
Final Thoughts: Your Kitchen Deserves Better
You made it to the end. That means you’re serious about transforming your kitchen from a grimy afterthought into the sparkling heart of your home. Mastering how to deep clean kitchen isn’t just about aesthetics—it’s about respect. Respect for the space where you nourish your family. Respect for your own health. And respect for your appliances that work so hard every day.
Here’s my challenge to you: Block off this Saturday morning. Grab the supplies I linked (trust me on the Krud Kutter and the steamer). Put on some music or a podcast. And work through each step one by one. When you’re done, stand in the middle of your kitchen and just breathe. That clean, fresh smell? That’s victory.
And don’t forget to bookmark this page. You’ll want to come back next quarter when it’s time to do it all again. Now go get scrubbing—your future self will thank you.
Disclaimer: This post contains affiliate links. If you purchase through these links, I may earn a small commission at no extra cost to you. I only recommend products I’ve personally tested and loved.